BusySync User Guide
Table of Contents
- Introduction
- What you can do with BusySync
- Installation
- Quick Start
- Configuring BusySync
- General
- Publish
- Subscribe
- Reset
- Log
- Scheduling Meetings
- Advanced Network Options
- Firewall Settings
- Remote Access (WAN)
- BusySync Conflicts calendar
- Removing BusySync
- Support
Introduction
BusySync enables you to share iCal calendars with others on your local area network and sync with Google Calendar. It does not require a dedicated server, and calendars may be shared with read-only or read-write access.
BusySync must be running on each computer you wish to share calendars with. It installs as a System Preference Pane and runs in the background keeping iCal calendars in sync over the network. If you go offline, you can continue editing calendars, and when you reconnect to the network your changes will be synchronized with others.
What you can do with BusySync
BusySync can be configured to support many different scenarios:
- Share iCal calendars on a LAN
- Share iCal calendars between multiple user accounts on a shared computer
- Share iCal calendars over the internet (WAN)
- Sync iCal calendars with Google Calendar for access on the web
- Sync iCal calendars between Home and Work using Google Calendar as a conduit
- Share iCal calendars with remote users using Google Calendar as a conduit
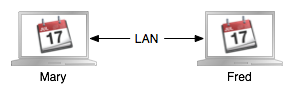
Share iCal calendars on a LAN
BusySync will allow you to share calendars with others on your local area network using Bonjour zero-configuration networking. When sharing calendars over your LAN, any changes made to a shared calendar are automatically synchronized within seconds to all users on the network. For more info, see Configuring BusySync.
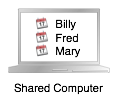
Share iCal calendars between multiple user accounts on a shared computer
BusySync will allow you to synchronize iCal calendars between multiple user accounts on a single Mac. Using BusySync on a shared computer is the same as using it on a LAN -- except you are sharing calendars with other users on the shared computer, rather than sharing calendars with other users on the network. You'll have to enable fast user switching and periodically login to all user accounts simultaneously so that BusySync can sync calendars between the different accounts. If only one account is logged in, any calendar edits made on that account will be treated as "offline" edits and will be synchronized the next time all accounts are logged in. For more info, see Configuring BusySync.
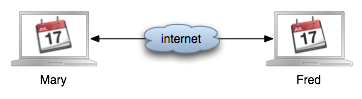
Share iCal calendars over the internet (WAN)
BusySync is designed to automatically share calendars on your local area network via Bonjour. If you wish to share calendars with a user in a remote location, you may do so by configuring BusySync for remote access over the public internet. This method requires a public IP address and port-forwarding on your router, and is recommended for advanced users only. For more info, see Remote Access (WAN).
As an alternative, it is recommended that you use Google Calendar as a conduit to sync calendars between Home and Work or to share calendars with remote users, which won't require a public IP address or any modifications to your router.
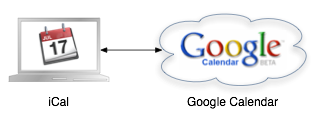
Sync iCal calendars with Google Calendar for access on the web
You may use BusySync to sync iCal with Google Calendar, so your calendars will always be accessible on the web from any computer (even on a Windows PC). Changes made in iCal are automatically sync'd to Google Calendar and vice versa. For example, if you have a Mac at home and a PC at work, you can sync your Home iCal with Google Calendar, and then from work you can access your Google Calendar using a web browser on a PC. And changes you make in Google Calendar will automatically sync back to iCal on your Mac at home. For more info, see Google.
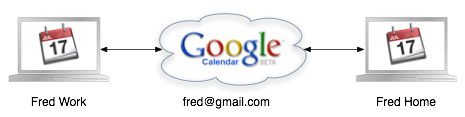
Sync iCal calendars between Home and Work using Google Calendar as a conduit
You can keep your iCal calendars in sync between your Home and Work computers by syncing both of them to the same Google Calendar account. For example, Fred has a computer at work and a computer at home and they are both configured to sync with the same Google Calendar account. So, if Fred makes a change on his iCal calendar at work, that change will be sync'd to Google Calendar, and from there it will be sync'd to iCal on his home computer. It is not even necessary to use Google Calendar's web interface — you can just use Google Calendar as a conduit between your home and work computers. This is a great way to keep remote Macs in sync (like home and work, a husband and wife, or a boss and an assistant), particularly if you travel a lot and need to be able to sync from any location. For more info, see How to sync iCal calendars between Home and Work with Google Calendar.
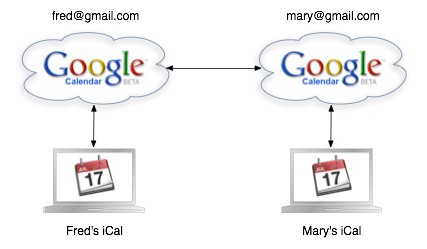
Share iCal calendars with remote users using Google Calendar as a conduit
Users in remote locations can share calendars with each other through Google Calendar without having to share a single Google Calendar account, as in the above example. Each of the users can sync iCal to their personal Google Calendar account, and then use Google Calendar's sharing features to share certain calendars with each other. For example, Fred syncs to his personal Google Calendar account, and Mary syncs to her personal Google Calendar account. Then Fred shares a calendar with Mary using the Google Calendar sharing interface, so that the calendar shows up in Mary's Google Calendar. Once there, it will sync to Mary's iCal through BusySync. And Mary can make changes to that calendar in iCal and it will sync back to Fred's iCal through Google Calendar. For more info, see How to share iCal calendars with remote users with Google Calendar.
Installation
BusySync installs as a Mac OS X System Preference Pane. To install BusySync:
- Download the BusySync.dmg file.
- Double-click the BusySync Preference Pane to copy it to System Preferences.
- After installation is complete, you may delete (or unmount) the files you downloaded in step 1.
If you wish to uninstall BusySync, see the instructions at the end of this document.
Quick Start — Syncing over a LAN
Install BusySync on two Macs (Mac A and Mac B) and do the following:
- Mac A: Publish
- Mac B: Subscribe
- Repeat
Open the BusySync Preference Pane, select the Publish tab, and click the checkbox next to the iCal calendars you wish to share. Enter passwords as desired in the Publish options dialog.
Open the BusySync Preference Pane, select the Subscribe tab, and select the checkboxes of the shared calendars from above. Enter a password if required. Once subscribed to a calendar, it will appear in the iCal source list as if it were a local calendar. If you have write privileges, you may edit events on that calendar, and changes will be synchronized with all others sharing that calendar.
Repeat the steps above to publish and subscribe to additional calendars on either Mac.
Quick Start — Syncing with Google
- Publish to Google
- Subscribe to Google
- Sync
Open the BusySync Preference Pane, select the Google tab, and select the iCal calendars on the left that you wish to publish to Google. These calendars will be automatically created on Google.
Select the Google calendars on the right that you wish to subscribe to in iCal. These calendars will be automatically created in iCal.
You may now add and edit events, in iCal or Google, on any of the calendars you published or subscribed to, and the events will sync in both directions between iCal and Google.
Configuring BusySync
To configure BusySync, open System Preferences and click the BusySync Preference Pane.
General
When you first open BusySync the General tab is displayed.
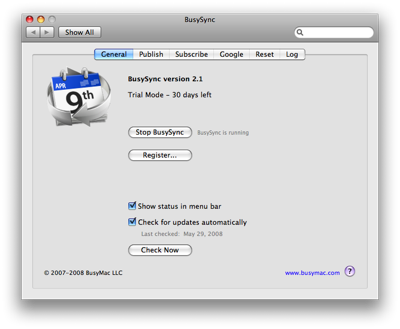
Start/Stop BusySync
Click the Start BusySync button to launch the background app. The background app runs invisibly and is responsible for keeping your calendars in sync with others on your network. It is always running, automatically syncing calendars with other BusySync users. iCal does not need to be running. Once you turn on BusySync, it is added to your Login items and will auto-start whenever you restart your computer or wake from sleep.
It is recommended that you leave BusySync running at all times. However, if you wish, you may stop BusySync by clicking the Stop BusySync button. When BusySync is stopped you can continue making changes to calendars you're Publishing or Subscribed to. Changes will be synchronized when you turn BusySync back on.
Register
BusySync will run for 30-days in full functioning trial mode. To continue using the software after the 30-day trial period you must purchase a serial number. You may purchase a serial number online at https://www.busymac.com/buy or click the Buy Now button in the Register dialog to purchase a serial number within BusySync.
BusySync requires a separate license for each computer. When purchasing multiple copies, you will receive a single serial number that can be used on all licensed computers. If you need more licenses in the future, you can purchase additional serial numbers that can be used along with your existing serial numbers.
Show status in menu bar
Select this checkbox to display a BusySync icon in your menu bar. When clicking the icon, a menu displays a list of the services you are syncing with and their sync status, as well as commands to Sync Now or open the BusySync Preference Pane. In addition, you may select the Display "!" When Service Offline menu command to show a red exclamation point in the menu bar if BusySync is unable to connect to one of the services you are syncing with.

Check for updates
Select this checkbox to automatically check for software updates (recommended). Or, you may check manually by clicking the Check Now button. If a Software Update is available, a dialog will display describing the new release with a button to download and install the update.
Publish
The Publish tab is where you select the calendars you wish to share with others on your LAN.
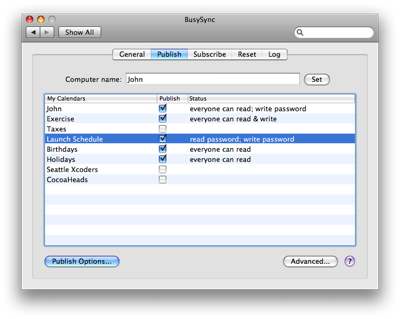
Computer name
The name that appears in the Computer name field is what other BusySync users will see when searching for other BusySync users on the network. It defaults to your account User Name but you can change it, if you wish, by entering a new name and clicking the Set button.
Calendar List
A list of your iCal calendars appears in the My Calendars column. To Publish a calendar for others to view or edit, click the Publish checkbox. When doing so, you’re presented with the Publish options dialog.
Publish options
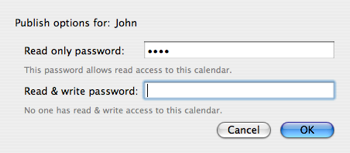
The Publish options dialog allows you to specify the access privileges for a calendar by setting a combination of read-only and read-write passwords. When a user subscribes to a calendar they will be granted the appropriate privileges based on the password they enter.
There are four possible combinations of access privileges as follows:
Everyone can read and write
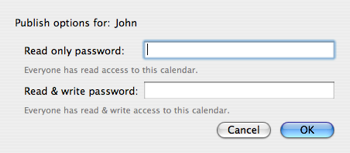
Leave both passwords blank to allow everyone full read-write access to your calendar without requiring a password.
Everyone can read; Write protected
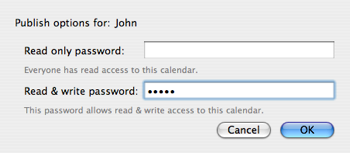
Leave the read-only password blank and enter a read-write password to allow everyone read access, while requiring a password for read-write access.
Read and Write protected
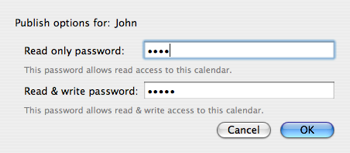
Enter a password in both fields to require a password to read or edit your calendar. Use a different password for each so subscribers will be granted the appropriate privileges based on the password they enter (either a read-only password or read-write password).
Read protected; No write access
Enter a read-only password and leave the read-write password blank to require a password for reading, while prohibiting write access.
Subscribe
The Subscribe tab displays a list of BusySync users on your LAN and the calendars they are sharing.
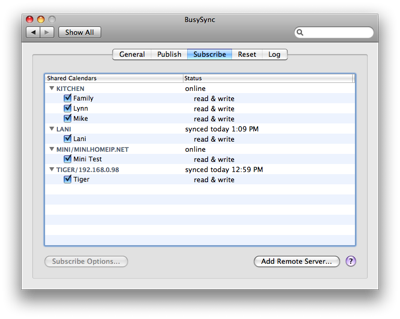
You may subscribe to a calendar by clicking the checkbox next to its name. When doing so, if the calendar is password protected, you’ll be prompted to enter a password for read-only or read-write access.
Subscribe Options
When subscribing to a calendar, all Events, To-Dos and Alarms will be synced with your computer. If you wish, you can remove To-Dos and/or Alarms by clicking the Subscribe Options button, and selecting the checkboxes to Remove Alarms and To-Dos.
- If you remove To-Dos from a calendar you are subscribed to, and you add a To-Do to that calendar, it will be rejected and placed in the BusySync Conflicts calendar.
- If you remove Alarms from a calendar you are subscribed to, and you add an Alarm to an Event on that calendar, the alarm will not be synced back to the host, but it will be stored locally.

Once you have subscribed to a calendar it will appear in your iCal Source List as if it were a local calendar. And, if you have write privileges, you may edit events on that calendar and those changes will be synchronized with others who are sharing that calendar.
Note: If you subscribe to a calendar with the same name as an existing calendar in iCal, a "(2)" will be appended to the new calendar (e.g. "Home (2)"). You may then rename that calendar to something else in iCal (e.g. "Fred Home"), if you wish. Both the original name and new name will be shown in the BusySync Subscribe tab (e.g. "Home -> Fred Home").
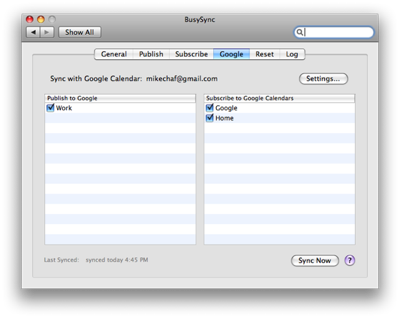
The Google tab provides options for syncing with Google Calendar. Google Calendar is a free web-based calendar that is very similar to iCal. Once you have enabled syncing with Google Calendar, you can edit your calendar in iCal or Google Calendar and the changes will automatically sync between the two.
Note: Google Calendar does not support To-Dos. Therefore, BusySync will not sync To-Dos with Google Calendar.
Settings
In order to sync with Google Calendar, you must enter your Google account login and password in the Settings dialog. BusySync supports both regular Google accounts (e.g. fred@gmail.com) and Google Apps for Your Domain accounts.
Click the Settings button and enter the following:
- Enter your Google Login and Password.
- Specify how often you want to sync with Google. 15 minutes is the default (recommended).
- Select SSL if you want to encrypt your data when syncing with Google Calendar (recommended).
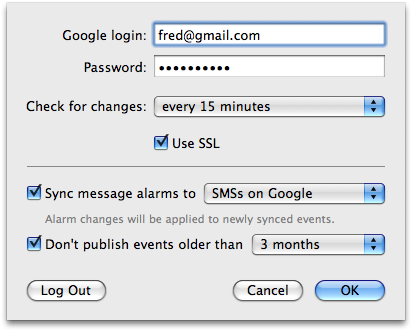
Google Alarm syncing
By default, Alarms are not synced between iCal and Google Calendar. If you wish, you may choose to sync Message Alarms in iCal to one of the following Google Alarm types by selecting the Sync message alarms checkbox and choosing one of the following options:
- Sync message alarms to pop-ups on Google
- Sync message alarms to SMSs on Google
- Sync message alarms to emails on Google

For example, if you sync message alarms to SMSs on Google, then any events you create in iCal with a message alarm will map to an SMS alarm on Google. And vice versa, any events created in Google Calendar with an SMS alarm, will map to a message alarm in iCal.
Note: when enabling Alarm syncing, the change is not retro-active and will only affect new events that you create and not existing events in your calendar. If you wish to make it retro-active, you must unpublish and/or unsubscribe from the calendars you are syncing with Google, enable the Alarm syncing preference, and then republish or re-subscribe to the calendars.
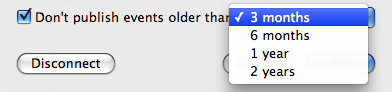
Google Date Range syncing
You can minimize the amount of data you publish to Google by selecting a date range limit from the "Don't publish events older than" popup. This will speed up syncing and reduce the chances of running into a Google quota error (Google limits the amount of data you can sync to protect against spam/abuse).
Once you've entered your Google Account settings, you're presented with two lists. On the left is a list of Calendars in iCal that you can Publish to Google. On the right is a list of calendars that exist on Google that you can subscribe to.
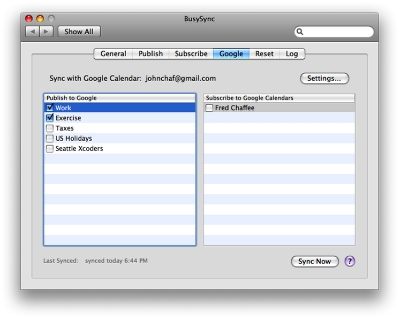
Publish to Google
Select one or more of the calendars on the left that you would like to Publish to Google. Once you select a calendar to publish to Google, that calendar will be automatically created on Google Calendar and it will be kept in sync between iCal and Google.
Subscribe to Google
Select one or more of the calendars on the right that you would like to Subscribe to. Once you Subscribe to a Google Calendar, that calendar will be automatically created in iCal and will be kept in sync between iCal and Google Calendar.
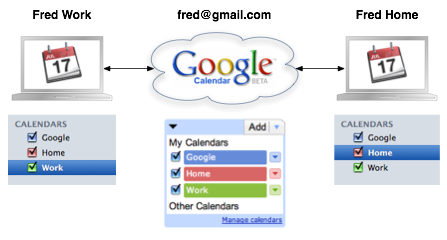
How to sync iCal calendars between Home and Work with Google Calendar
You can synchronize iCal calendars between home and work using Google Calendar as a conduit. Both the Mac at home and the Mac at work must sync with the same Google Calendar account. In this example we'll start out with a Mac at work, a Mac at home, and a Google Calendar account, each containing one calendar. This is how you can get all of them in sync.
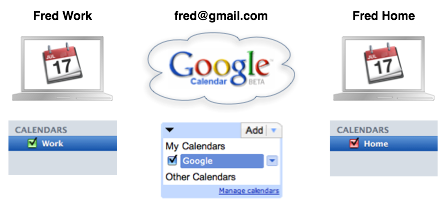
On the Work computer, Publish the Work calendar, and subscribe to the Google and Home calendars.
On the Home computer, Publish the Home calendar, and subscribe to the Google and Work calendars.

The end result shows all of the calendars being synchronized between Work, Google Calendar, and Home. Any changes made on a calendar at any location, will sync between all of them.
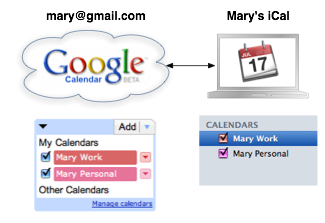
How to share iCal calendars with remote users with Google Calendar
You can share iCal calendars between different users in remote locations using Google Calendar as a conduit, without having to share a single Google Account (as in the previous example). In this example we'll start out with Fred and Mary, each syncing their Macs with their personal Google Calendar accounts, and then show how they can use Google Calendar to share calendars with each other.
We start out with Fred syncing his Work and Personal calendars with his Google Calendar account.

Mary is doing the same thing and syncing her Work and Personal calendars with her Google Calendar account.
Mary wants to share her work schedule with Fred. Since both Mary and Fred have their own Google Calendar accounts, they can share calendars with each other through Google Calendar. Mary logs in to Google Calendar, clicks the Manage Calendars link under the source list on the left, then clicks the Share this calendar link next to her Work calendar.
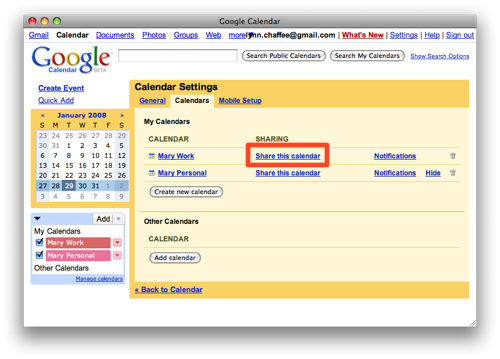
Then she enters Fred's Google account info (fred@gmail.com) and selects whether he can Make changes to events (read-write), See all event details (read-only), or See free/busy information (no details) on her calendar. In effect, Mary is Publishing her Work calendar to Fred's Google Calendar account.

Mary's Work calendar will automatically show up on Fred's Google Calendar, and from there BusySync will synchronize it with Fred's iCal.
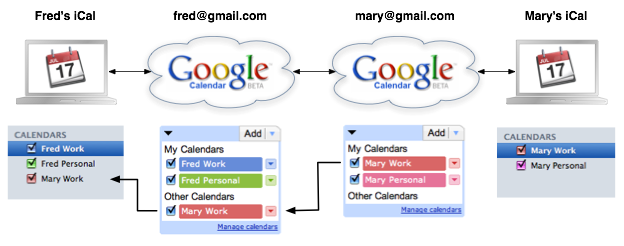
This process can be repeated with other calendars that Fred or Mary wish to share with each other or with other Google Calendar users.
Understanding Host privileges
When syncing with Google Calendar, it's important to understand who the Host, or Publisher, is for each calendar, because only the Host can delete a calendar.
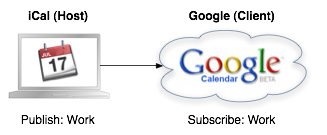
In the example above, iCal is the Host (Publisher) of the "Work" calendar and Google is the Client (Subscriber). If the "Work" calendar is deleted in iCal, it will also be deleted on Google Calendar, because iCal is the Host. But if the "Work" calendar is deleted on Google Calendar, it will not be deleted in iCal, because Google is the Client and not the Host. What will happen instead is the "Work" calendar will be automatically unchecked in the Publish to Google list and stop being Published to Google Calendar.
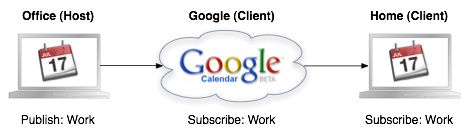
To take it a step further, suppose you have a Mac at the Office and a Mac at Home you want to sync through Google Calendar. At the office, you could publish your "Work" calendar to Google Calendar. Then, at home, you could subscribe to the "Work" calendar on Google Calendar. In this scenario, the Office Mac is the Host, and both Google Calendar and the Home computer are the Clients.
Regardless of how you set it up, there is always only one Host for each calendar. Whether you Host the calendars in iCal or Google is entirely up to you. There's no right or wrong way to do it. You can consolidate all of your calendars and Publish them from one Host, or Publish calendars from multiple Hosts. Whatever makes sense for you.
How to merge calendars in iCal and Google Calendar
Google Calendar requires you to have a primary calendar that you cannot delete. You can subscribe to this calendar in the BusySync > Google > Subscribe tab. This will add the calendar to iCal as a separate calendar.
However, you may have a calendar in iCal that you'd like to merge with your Google primary calendar, rather than have them stored separately. For example, let's say you have your Google primary calendar "Fred", and you have a "Home" calendar in iCal that you want to merge. This is how you can merge them:
- Subscribe to the Fred Google Calendar in BusySync. It will be added to iCal.
- Export the Home calendar in iCal by selecting the calendar and choosing File > Export. Then delete the Home calendar in iCal by control-clicking it and selecting Delete.
- Double-click the file you exported in step 2 to re-import it into iCal. When prompted, choose to add the new events to the Fred calendar. This will merge the events from the old Home calendar with the Fred Google Calendar.
Now you're left with one Fred calendar that is hosted on Google and kept in sync with iCal.
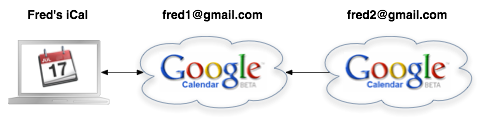
How to sync with multiple Google accounts
BusySync will only sync with one Google account. If you have multiple Google accounts, however, you can sync with all of them indirectly by sharing calendars between your various Google accounts:
- Login to one of your Google Calendar accounts and select Settings > Calendars.
- In the Sharing column, click Share this calendar and enter the email address for your other Google Calendar account and click Save. Now, that calendar will appear in your other Google Calendar account. Repeat this process for all calendars and accounts you want to sync with.
- Last, setup BusySync to sync with the Google account that contains all of the calendars from your multiple Google accounts.
Syncing Attendees with Google Calendar
Google Calendar automatically creates duplicate events on your primary calendar for all meetings (events with attendees) created on secondary calendars. If an event contains you as a Meeting Organizer or Attendee, Google Calendar will automatically create a copy of that event on your primary Google Calendar. It will not create a copy if the event is on your primary Google Calendar to begin with. Google Calendar does this in order to block out your free/busy time on your primary calendar for all events you are attending.
To avoid these duplicate events from being created on Google Calendar, BusySync does not sync attendee information for events created in iCal. It will, however, sync attendee information for events created on Google Calendar. Therefore, if you want to attendee information to sync between iCal and Google, you must create the event in Google Calendar.
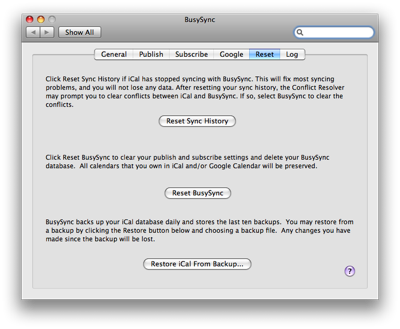
Reset
The Reset tab provides options for resetting BusySync and restoring iCal from a backup.
Reset Sync Services
If BusySync is unable to sync with Sync Services, an error may display alerting you to the problem. Typically, restarting your computer will "wake up" Sync Services and solve the problem. If not, you may be able to solve it by resetting your sync history, as follows:
If you're running Mac OS X 10.7 Lion, 10.6 Snow Leopard, or 10.5 Leopard:
- Open the BusySync prefpane, select the Reset tab and click the Reset Sync History button. Then wait several minutes for BusySync, Sync Services and iCal to get in sync.
If you're running Mac OS X 10.4 Tiger:
Reset BusySync
Click Reset BusySync to clear your publish and subscribe settings and delete your BusySync database. All calendars that you own in iCal and/or Google Calendar will be preserved. After performing the reset, you must reconfigure your Publish and Subscribe options.
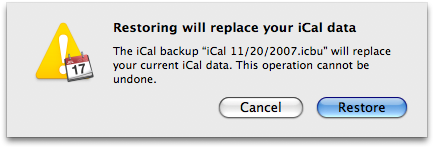
Restore iCal From Backup
BusySync automatically backs up your iCal database every 24 hours and saves your last 10 backups in ~/Library/Application Support/BusySync/Backup. If your iCal calendar becomes corrupted, or you have lost data, you may revert to one of these earlier backups by doing the following:
- Click the Restore iCal From Backup button.
- In the dialog that appears, select a recent backup file and click Open.
- iCal will launch and you’ll be warned that your current database will be overwritten.
- Click Restore and your current iCal database will be replaced with the earlier copy.
Log
The Log tab displays a summary of what BusySync is doing. If something isn't working right, check the log to see it provides any clues. When errors occur, a message is printed in the log with thee asterisks (***). For example, if you attempt to edit an event on a calendar that you don't have write privileges on, an error message will be printed to the log like this:
*** iSync: you don't have permission to modify the event Lunch
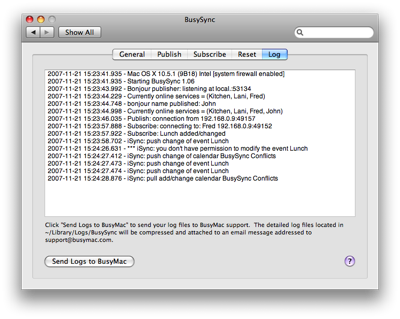
Send Logs to BusyMac
If you are having a problem and need help solving it, click the Send Logs to BusyMac button. This will launch your default email application and create a new message addressed to support@busymac.com with your log files attached as a zip file. Please provide a description of the problem in the body of the message including the names/dates of specific events that are not syncing. We will examine your logs and respond promptly.
Scheduling Meetings
iCal allows you to schedule meetings with others by adding Attendees to an event and sending meeting invitations via email. This is a handy way to invite people to meetings but it can result in duplicate events appearing on a user's calendar when creating meetings on shared calendars. The original event on the shared calendar will get synced to the user's calendar via BusySync, and the event will get added to the user's calendar when they accept the meeting invitation received via email.
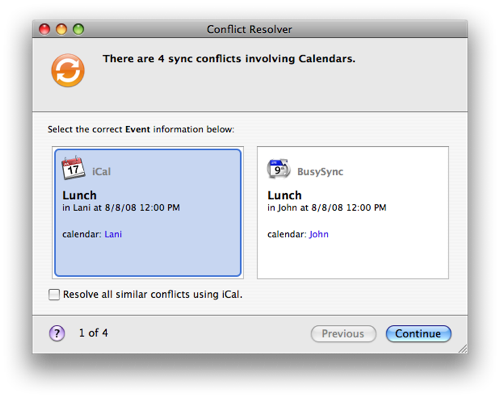
The duplicate meetings are bad enough, but what's worse is that Sync Services considers two events on your calendar with the same name and same start time to be a conflict. The Conflict Resolver will appear, and force you to resolve the conflict by choosing one of the events to keep and one to delete. This is a nuisance and can lead to data loss and frustration.
To circumvent this problem, BusySync will automatically append the calendar name in [brackets] to the title of a meeting on a subscribed calendar. That way if a "Lunch Meeting" is created on the "Company Calendar", and invites are sent to all employees, each employee will receive a meeting invitation via email with the original title, "Lunch Meeting", that they will add to their calendar. Plus, the "Lunch Meeting" on the shared calendar will sync to their calendar via BusySync and automatically be renamed "Lunch Meeting [Company Calendar]". This will avoid the Conflict Resolver problem of having two events with the same name and start time. And it may help users to better understand why they have duplicate meetings on their calendar (one was added via email and the other was synced via BusySync).
Advanced Network Options
By default, BusySync will use a dynamic port when Publishing calendars on your local area network. However, you may assign a static port and/or use SSL encryption (Mac OS X 10.5 Leopard only) by clicking the Advanced button in the Publish tab and selecting the appropriate options.

There are three primary reasons you may want to modify these settings:
- You are running Mac OS X 10.4 (Tiger) system firewall and need to assign a static port for BusySync incoming network traffic to pass through the firewall. See the Tiger Firewall instructions below for more info.
- You want to make your Mac accessible over the public internet to remote BusySync users by configuring port-forwarding on your router to direct traffic on a specific port to BusySync on your Mac. See the Remote Access instructions below for more info.
- You want to encrypt all BusySync network traffic by enabling SSL.
Firewall Settings
BusySync should operate fine without having to adjust any network settings. However, if you have enabled your Mac's system firewall, you will have to modify your settings to allow BusySync network traffic through your firewall. The instructions differ for Tiger and Leopard.
Note: It is only necessary to modify your firewall settings on computers that are Publishing calendars. It is not necessary to adjust the firewall settings on computers that are only Subscribing to calendars.
Tiger Firewall Settings
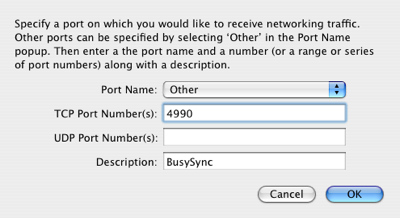
By default BusySync will dynamically choose a network port for sending/receiving network traffic. If you have enabled the Mac OS X Firewall in Tiger (10.4), you will need to set a static port for BusySync to use and open that port on your firewall.
To do so, click the Advanced button in the BusySync Publish tab, select the Static radio button and enter a port number between 1000 and 65535.
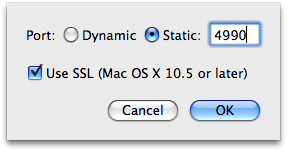
BusySync will default to port 4990 (recommended). If you want to use a different port number, see well known TCP ports used by Apple software products to select a unique port.
Next, open the Sharing Preference Pane in System Preferences, click the Firewall tab, then click the New button.
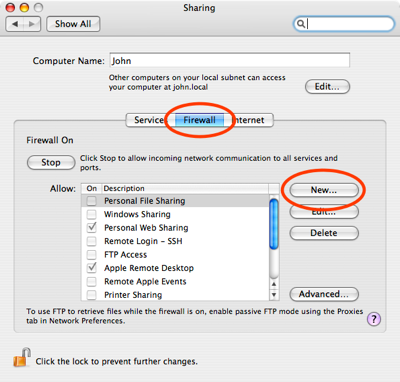
In the dialog that appears, enter the TCP port number and description for BusySync. You may leave the UDP field blank.
Now your computer will allow BusySync to accept incoming network traffic through that port on your firewall. Note: It is not necessary to set a static port in BusySync on the other computers on your network. Those computers will automatically detect the port BusySync is using on your computer, as long as the Firewall allows network traffic through that port.
Leopard Firewall Settings
To enable BusySync to accept incoming traffic through Leopard's Firewall, open System Preferences and select the Security Preference Pane.
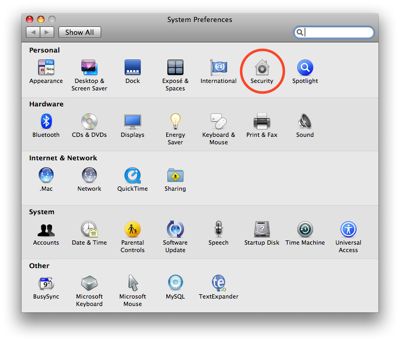
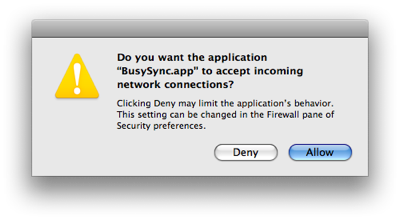
Select the Firewall tab and choose the third radio button labeled "Set access for specific services and applications". Then click Show All in the toolbar to return to System Preferences.
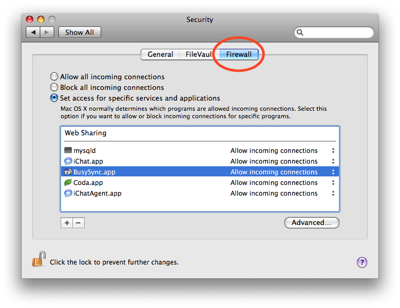
Restart you computer. When your computer is done restarting, you'll be asked if you want BusySync to accept incoming network connections. Click "Allow" to allow BusySync network traffic through your firewall.
Remote Access (WAN)
BusySync is designed to automatically share calendars with other BusySync users on your local area network via Bonjour. If you wish to share calendars with a BusySync user in a remote location, you may do so by configuring BusySync for remote access over the public internet.
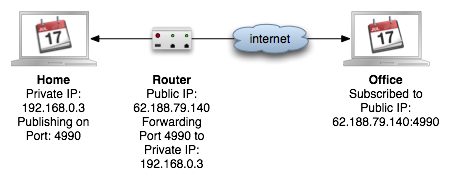
To configure BusySync for remote access requires a static public IP address for your Cable/DSL Modem, a static private IP address for the Mac on your LAN that is Publishing calendars via BusySync, and port-forwarding on your router (which may be your Cable/DSL Modem, an Airport Extreme Base Station, or some other device) configured to forward all incoming requests on a certain port (4990 is the default for BusySync) to your Mac's private IP address.
Note: Port Forwarding is a complex topic and is recommended for advanced users only. As an alternative to port-forwarding, it is recommended that you sync iCal calendars between Home and Work or with remote users using Google Calendar as a conduit. This can be achieved without making any modifications to your router and enables you to sync from any location, even while traveling.
It is beyond the scope of this user's guide to explain how to configure port-forwarding on your router, but the following resources may prove helpful:
- Port Forwarding Tutorial
- Designing Airport Networks, Using Port Mapping section (page 59), describes how to configure port mapping on an Airport Base Station.
If you are comfortable with port-forwarding and wish to use this method, you may continue with the following instructions for configuring one Mac to publish calendars over the internet, and the other Mac(s) to subscribe to calendars over the internet.
Publishing calendars over the internet
To publish calendars for other BusySync users to access over the internet, you will have to configure BusySync to listen for incoming traffic on a static port and configure your router to forward incoming traffic on that port to your computer.
- Click the Advanced button in the BusySync Publish tab, select the Static radio button, and enter a port number between 1000 and 65535 (BusySync will default to port 4990). Optionally, if you're running OS X 10.5 Leopard, you may use SSL to encrypt the data (recommended). If you wish to use a different port number, see well known TCP ports used by Apple software products to choose a unique one.
- Configure your router to forward all incoming traffic on the port specified above to your computer. See the documentation that came with your router for information on how to configure port forwarding. Also, if you are running Mac OS X 10.4 (Tiger) and have the system firewall enabled, make sure you allow incoming traffic on that port.
Note: In an environment with multiple users and users in remote locations, it is recommended that you designate one Mac as the host where you publish all calendars. This will simplify your network administration and maintenance as you'll only have to configure your router to port-forward to one Mac.
Subscribing to calendars over the internet
BusySync automatically displays all of the BusySync users and the calendars they are publishing on your local area network in the Subscribe tab. If you wish to subscribe to calendars being published by a BusySync user at a remote location, however, you will have to configure BusySync to connect to that user manually by clicking the Add Remote Server button.
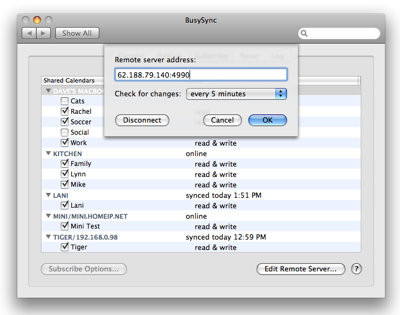
- Click the Add Remote Server button and enter the remote user's public IP address or domain name followed by a colon and the port number (e.g. 62.188.79.140:4990 or my.example.com:4990). If no port is specified, the default port 4990 will be used. See publishing calendars over the internet for more info.
- Select how often you would like BusySync to check for changes (every 5 minutes is recommended). Note: any changes you make to a remote calendar that you are subscribed to will be sync'd immediately to the server. Otherwise, BusySync will check with the server at the specified interval to see if any events have been changed by others.
The remote server will be added to the Subscribe tab. You can alter the server address, or remove the server from the list, by selecting the server and clicking the Edit Remote Server button.
Note: You can subscribe to a server in your office via Bonjour and then connect to it remotely while at home or traveling by following the steps above. When doing so, BusySync will recognize that the server you are connecting to remotely is the same server that you previously connected to via Bonjour, and will bind the two together so you don't end up with two identical servers in the list (one local and one remote). And BusySync will automatically choose the best method for connecting to that server (it will connect via Bonjour when you're on the same LAN, otherwise it will connect over the internet).
Conflict Resolver
BusySync uses Apple's Sync Services to sync calendar data to iCal. Sync Services has a fundamental limitation that two events with the same name and date cannot exist on two different calendars. If they do, the Conflict Resolver will pop up and require you to choose which event to keep and which to delete. This can cause havoc when sharing calendars on the network.
To avoid such problems, you need to work within the limitations of Sync Services. This means you need to be careful when first setting up BusySync to remove any duplicate calendars on a subscribing machine that may be left over from using previous syncing applications (such as MobileMe or iCloud). Also, you need to design a workflow that avoids duplicating events.
Often companies want to create a shared calendar for each employee, but when several people put the same event on their calendars, that can lead to conflicts. One solution is to prefix such common events with the person's initials, so there won't be conflicts with other calendars. See Scheduling Meetings for more info.
BusySync Conflicts calendar
BusySync automatically creates a BusySync Conflicts calendar and places events in that calendar in the following scenarios:
- If a user has read-only access to a calendar and edits an event on that calendar the edit will be rejected. Rather than delete the event entirely, the event is placed in the BusySync Conflicts calendar so you won't lose the info and can later move the event to a different calendar where you do have write privileges.
- If the same event is edited by more than one person since the last sync, one event will be accepted and the other will be rejected. The rejected one ends up in the BusySync Conflicts calendar. That way you won't lose the edits you made and can compare it to the event that it conflicted with and make edits as necessary.
- If you are subscribed to a calendar and have removed To-Dos from the calendar, and you attempt to add a To-Do to that calendar, the To-Do will be rejected and placed on the BusySync Conflicts calendar.
If you're curious to know why a conflict occurred, check the Log tab where a description of the problem will appear preceded by three asterisks (***) explaining whether or not you have write access or some other error occurred.
Removing BusySync
You can uninstall BusySync by doing the following:
- Open the BusySync Preference Pane.
- Select the General tab and uncheck "Show status in menu bar".
- Select the Reset tab and click the Reset BusySync button.
- Click Show All in the toolbar to return to System Preferences.
- Control-click on the BusySync Preference Pane and choose Remove “BusySync” Preference Pane.
- Optionally, delete the files located in /Users/username/Library/Application Support/BusySync and /Users/username/Library/Logs/BusySync.
Support
If you run into a problem using BusySync there are several options available for support:
- FAQs — answers to frequently asked questions can be found at www.busymac.com/faq/index.html.
- Forum — search the archives and interact with others at groups.google.com/group/busymac.
- Technical Support — If you're experiencing technical problems, send your logs to BusyMac.
- General Questions — If you have general questions, email BusyMac.