Free/Busy Availability Viewer
When your calendar service supports it, BusyCal can show the free/busy status of the organizer and all attendees as you schedule a meeting. The Availability Viewer brings together traffic-light status indicators, a full-day timeline, hover tooltips, and an automatic next-available-time search — so you can pick a slot that works for everyone without leaving the event.
This feature is supported by:
- Exchange and Office 365
- Google Calendar
- Fastmail
- Fruux
- macOS Calendar Server
- Kerio
- Zimbra
This feature is not supported by:
- iCloud
- Yahoo
- Communigate
- Beehive
Available Meeting Times
To view attendee availability, add one or more attendees to an event on the Info Panel, then tab or click out of the Attendee field. If the calendar service supports free/busy lookup and you are the meeting organizer, a Check Availability... button appears — click it to open the Availability Viewer. You can also open it any time from Window > Availability Panel (⇧⌘A).
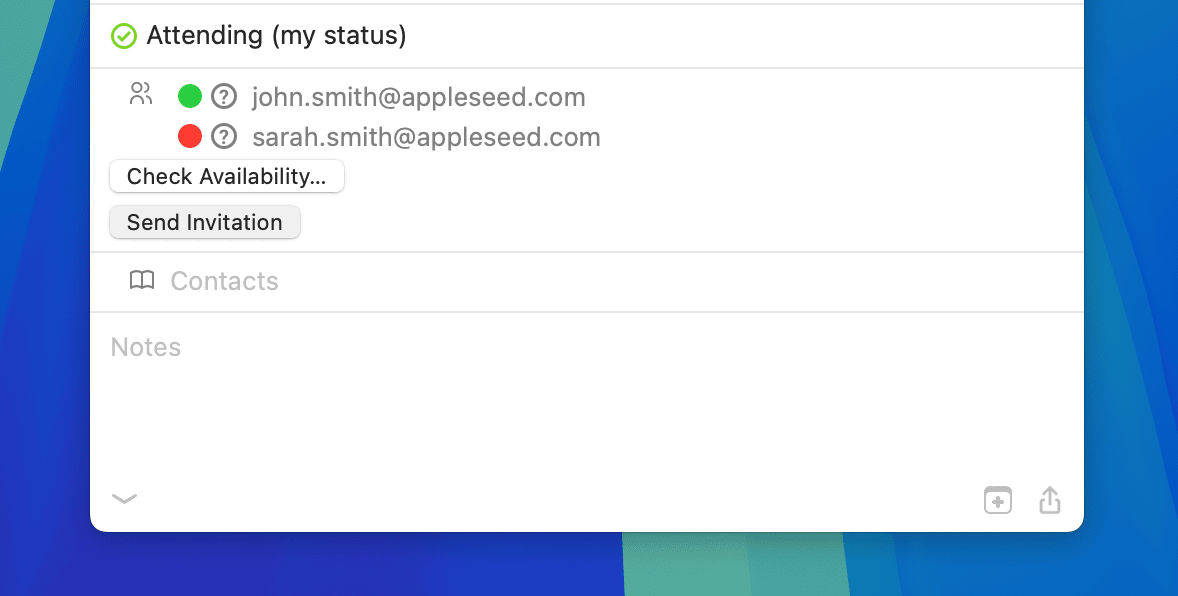
Free / Busy Availability Indicators
For services that allow free/busy lookups, BusyCal displays a small traffic light next to each attendee's name. Its color reflects that attendee's availability for the proposed meeting time:
- Green — Available.
- Yellow — Tentative conflict, but no hard conflict.
- Red — Unavailable: busy, out of office, or otherwise blocked.
- Gray — Status is unknown, still loading, or could not be retrieved from the server.
A larger summary traffic light appears at the top-left of the timeline, next to the proposed time. It reflects the effective group availability — i.e. the combined status across every attendee included in the decision (optional and muted attendees are excluded). Hover it for a one-line summary.
Free/busy indicators are shown only when BusyCal can request availability from the meeting service and you are the meeting organizer.
Availability Viewer
The Availability Viewer shows the organizer and each attendee as rows on a horizontal day timeline. The top-left summary displays the proposed meeting time together with the effective group availability. The timeline uses the following visual cues:
- Blue outlined block — The proposed meeting time.
- Green dashed ribbon — A slot where everyone included in the group decision is free, long enough to fit the meeting.
- Orange striped block or ribbon — Tentative availability.
- Solid gray block — Hard busy time.
- Gray striped block — Out of office, working elsewhere, or outside-hours time reported by the server.
- Subtle shaded regions — Time that falls outside your configured working hours (only visible in All Day mode).

At a glance, the Availability Viewer lets you:
- See the effective group availability for the proposed time via the large traffic-light summary at the top-left.
- Read each attendee's status at a glance from the traffic light next to their name.
- Hover the compact legend in the upper-right corner to identify the organizer marker, proposed time, free, tentative, busy, and out-of-office / outside-hours blocks.
- Hover any attendee row, timeline block, group ribbon, or the current-time marker for a contextual tooltip. When the server discloses event details, BusyCal includes the meeting title and location in the tooltip.
- Click or drag in the timeline to move the proposed meeting time in 15-minute increments — the summary and traffic lights update live.
- Click Next Available Time to jump to the next slot where every included attendee is free. While the search is running, the button changes to Cancel Search so you can stop it at any time.
- Use the arrow buttons to step through days, or click the date label to jump back to today.
- Toggle between All Day and Work Hours to control the visible time range. The footer shows the active working-hours range.
- Watch the live Now marker when the selected day is today.
- Click an attendee row to temporarily mute that attendee from group calculations. Muted rows stay visible but are dimmed. Optional attendees are likewise excluded from the effective group decision while remaining on the timeline for context.
After setting the time of a meeting in the Availability Viewer, click Send Invitation on the Info Panel to notify the attendees of the meeting.
Setting Your Availability
A user can indicate on a per-event basis whether the event shows them as Busy or Free by choosing a status from the “show as” pop-up menu in the Info Panel for that event (for Exchange calendars) or by checking the “busy” box in the Info Panel (for CalDAV calendars). Note that you cannot do this for events sent as invitations to you. You can only do this on events you create, so others can see you're free/busy at the time they wish to invite you.
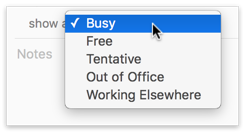
To display the “show as” pop-up menu or the “busy” checkbox in the Info Panel, choose BusyCal > Settings > Info Panel, and check the “Busy” checkbox. The “show as” pop-up menu (for Exchange calendars only) contains the following options that you can set on a per-event basis:
- Busy — Indicates you are busy at that time.
- Free — Indicates you are free at that time.
- Tentative — Indicates you may be busy at that time.
- Out of Office — Indicates you are away at that time.
- Working Elsewhere — Indicates you are away at that time.
Access Privileges
In order for a meeting organizer to see the availability of an attendee, the attendee must share their calendar with the organizer and grant the organizer the necessary access privileges.
Attendees can change access privileges by Control-clicking a calendar in the sidebar, choosing Get Info from the contextual menu, and choosing the desired option next to the organizer’s name:
For Exchange calendars only, if the attendee grants the organizer “Availability” access to their calendar, the organizer can see the attendee’s free/busy time blocks in the Availability Viewer, but not event titles or locations.
Also for Exchange calendars only, if the attendee grants the organizer “Availability, Title, Location” or higher (Read Only, Read & Create, Read & Write, or Delegate) access to their calendar, then the organizer can see disclosed event titles and locations in the Availability Viewer and its tooltips.
For CalDAV calendars, if the attendee selects the checkbox next to the organizer’s name in the Allow Write column, the organizer can see the attendee's event titles and can make changes to the attendee’s calendar.
Availability access can be granted only on your primary calendar.
When syncing with Exchange, only events on your primary calendar affect your availability. Events stored on secondary calendars do not affect your availability and do not appear in the Availability Viewer as blocking your free time. This limitation does not apply to CalDAV servers.